official firmware 4.4.2 then reset efs and repair imei like this
1-
Select Supported Model From List
2- Put Your Phone In Download
Mode
3- Reset Default EFS
4- Select Comport Use UART
Cable
5- Chose Supper IMEI
6- Select Repair IMEI +
UNLOCK
7- Do Factory Mode
(Further Network and 3g
Problems)
8- Select Comport Use UART cable
9- Dial *#7284# and
choose UART -> MODEM and Qualcom Setting DM+MODEM+ADB
10- DIAL
*#0808&# Select DM OVER UART
11- Do 3G NETWORK REPAIR

We are a cell phone and mobile electronics store located in the heart of Hialeah. We service companies such as Simple Mobile, H2O, Net10, RedPocket, Spot Mobile, T-Mobile, AT&T, Ultra, etc. The store also has repair services. Please come by, visit us. ADDRESS:3777 E 4 Ave Hialeah, FL, 33013 (786) 431-6051
miércoles, 8 de octubre de 2014
lunes, 18 de agosto de 2014
Root for AT&T Galaxy Mega 6.3
How to: One-click root for AT&T Galaxy Mega with MK2 software update
AT&T Galaxy Mega (SGH-I527) has been received a minor software update last month with baseband I527UCUAMK2 via OTA. We say a minor update, since there’s no OS upgrades in other words still loaded with Android 4.2.2 Jelly Bean. Fortunately, superuser access still can be obtained on this smartphone, so no reason for rooted users to overlooked it.
Until now only one tool that has been successfully regained root on the AT&T Galaxy Mega running MK2 software version. This tool in the past also successfully achieves root on the older software version before MK2 update released, so we are not surprised if it also works on the most recent software update.
For those who do not know the MK2, it brings Samsung Galaxy Gear software support as a key enhancement, while others such as improved camera, add Google security patches, updated third-party apps, etc. I’m sure many of you were a little disappointed not to get the Android OS upgrades just like the Galaxy S4 or Note II, however, a minor update is better than nothing.

Until now only one tool that has been successfully regained root on the AT&T Galaxy Mega running MK2 software version. This tool in the past also successfully achieves root on the older software version before MK2 update released, so we are not surprised if it also works on the most recent software update.
Prerequisites
- Enable USB Debugging on our phone, it’s required.
- Get Galaxy Mega drivers for Windows computer, although the tool can install the required drivers automatically, it’s better to do it manually.
- Download Kingo Android Root tool for Windows, this is a universal one-click root app that has been proven to provide root for dozens of Android devices.
Image: Samsung/AT&T
How to AT&T Galaxy Mega MK2 root by using Kingo Android
- Install Kingo on your PC then runs it.
- Connect your phone to your PC using the OEM USB cable, if you can avoid using a USB 3.0 slot.
- Kingo will attempt to get in touch with your phone, this process may take a while if you don’t have the drivers or it’s out-of-date. If you are experiencing problems while running this app in Windows 8, you can follow this guide.
- Once successfully connected, then the app will recognize your device.
- It’s time to hit the Root button to start the rooting process.
- Once successfully rooted, the phone will reboot and we will find a new app called SuperSU, our AT&T Galaxy Mega on MK2 should rooted now.

sábado, 16 de agosto de 2014
Samsung Galaxy Rugby Pro I547 UNLOCK PROCESS (Z3X)
Lo unico que tienes que hacer es degradar de version con esta
I547UCBLL1_I547ATTBLL1_I547UCBLL1_HOME.tar.md5.gz
http://pan.baidu.com/wap/link?uk=1093220177&shareid=1110212437&third=0
0
http://www.4shared.com/archive/qUuWEUxHce/i547ucbll1_i547attbll1_i547ucb.htm
te la va a dejar a la version 4.1.1
ya estando en esa version no hay necesidad de root ni nada
solo seleccionas el modelo t989 o t999 en z3x o nspro
en el cel tecleas *#7284# y seleccionas modem
conectas por medio de cable uart s7070(nspro) o c3300 (z3x)
le das direct unlock y listo.
jueves, 29 de mayo de 2014
LG metro pcs LGMS323 UNLOCK L20
LG metro pcs LGMS323, lo hice con octopus selecionando el modelo D320F8, lo hiso de una y sin batallar no tubo ningun riesgo, asi que para esos que no tienen creditos o no tengan la LGtool esta es una forma gratis y segura, se hace con el metodo tradicional depuracion usb y lg software .
Platform: LG Qualcomm
Selected port: COM55
Selected model: D320F8
Reading info...OK
Mode: Normal
Model ID: WX_PROJE
Firmware compiled date: Feb 12 2014
Firmware compiled time: 05:00:00
Firmware released date: Mar 9 2014
Firmware released time: 16:02:50
SW Version: M8610B-AAAANAZM-1.0.6038
IMEI: 014038-00-083960-9
Unlocking...
Reading NVM...OK
Backup saved to "D320F8_014038000839609_12-05-2014_12-41-
30.NVM"
Switching to Download mode...OK
Initializing flash...OK
Reading partition...OK
Reading security area...OK
Backup saved to "D320F8_014038000839609_12-05-2014_12-45-13.SEC"
Writing security area...OK
Switching to Normal mode...
Found model WX_PROJE at port COM55
Checking data...OK
Writing NVM...OK
NVM succesfully repaired.
Phone successfully unlocked!
To complete the operation, please make Factory Reset (Go to "Settings" ->
"General" -> "Backup & reset" -> "Factory data reset", press "Reset
phone" and "Erase everything" buttons).
viernes, 23 de mayo de 2014
Download and Install Google Nexus 5 USB Drivers (ADB / Fastboot)
Google Nexus 5 was launched and now users who want to unlock its bootloader, root it and flash custom ROMs can read this tutorial and learn how to flash the Nexus USB Drivers.
Also, the same USB Drivers will allow you to connect your smartphone with your computer, so that you’ll be able to copy and paste files between them. Use this tutorial and learn how to flash all the required files easily on your computer.
These drivers can be installed on all Windows editions without problems. If you cannot complete the installation, then you can ask for more help in comments.
Google Nexus 5 comes with Android 4.4 KitKat, a locked bootloader, un-rooted. USB Drivers are essential for connecting Nexus 5 with computers to transfer files back and forth, but also for flashing custom ROMs, kernels, files, unlocking bootloaders and others more.
Make sure to enable the USB Debugging for your Google Nexus 5 from the Developer Options first.
Google Nexus 5 Download Mode can be launched like this:
Also, the same USB Drivers will allow you to connect your smartphone with your computer, so that you’ll be able to copy and paste files between them. Use this tutorial and learn how to flash all the required files easily on your computer.
These drivers can be installed on all Windows editions without problems. If you cannot complete the installation, then you can ask for more help in comments.
Google Nexus 5 comes with Android 4.4 KitKat, a locked bootloader, un-rooted. USB Drivers are essential for connecting Nexus 5 with computers to transfer files back and forth, but also for flashing custom ROMs, kernels, files, unlocking bootloaders and others more.
Make sure to enable the USB Debugging for your Google Nexus 5 from the Developer Options first.
- Open Settings, then About Phone.
- Tap the Build Number seven times to unlock Developer Options.
How to install Google Nexus 5 USB / ADB / Fasboot / Bootloader drivers:
- Download the Nexus 5 Drivers from here.
- Extract the zip contents and place all files in a single folder on your desktop.
- Connect your device to your computer.
- Launch the Device Manager on your PC.
- Now you should see the Nexus 5 listed in the hardware list.
- Right-click the ‘Nexus 5′ line and then click on Update Driver Software.
- Next, click the ‘browse my computer’ option.
- In the new window click on ‘Browse…’ button.
- Go to folder unzipped at step 2. Select the folder where you extract the USB Drivers. Click Next.
- make sure to tick the subfolder box too. - Now, the Windows installer will search for Nexus 5 drivers, click Install when asked for permission.
- Wait for the process to complete and then check the Device Manager list to confirm that the installation was successful.
Google Nexus 5 Download Mode can be launched like this:
- power off your phone.
- press and hold Volume Down and Power buttons simultaneously
- an Android robot will show up and the Fastboot Mode text is listed. - connect the Nexus 5 to your PC via USB Cable.
- from this menu you can access Recovery and all the other
miércoles, 7 de mayo de 2014
¿Qué iPhone 5S o 5C desbloqueado debo comprar

¿Qué iPhone 5S o 5C desbloqueado debo comprar ?

iPhone 5S
Modelo A1533 (GSM) – Esta es la versión desbloqueada de fábrica que se vende en el sitio de Apple así como la diseñada para AT&T y T-Mobile (Estados Unidos), Bell (Virgin), Rogers (Fido) y Telus (Koodo) en Canadá. No es compatible con CDMA.
Las redes compatibles son: UMTS/HSPA+/DC-HSDPA (850, 900, 1700/2100, 1900, 2100 MHz); GSM/EDGE (850, 900, 1800, 1900 MHz); LTE (Bands 1, 2, 3, 4, 5, 8, 13, 17, 19, 20, 25)
Las redes compatibles son: CDMA EV-DO Rev. A and Rev. B (800, 1700/2100, 1900, 2100 MHz); UMTS/HSPA+/DC-HSDPA (850, 900, 1700/2100, 1900, 2100 MHz); GSM/EDGE (850, 900, 1800, 1900 MHz); LTE (Bands 1, 2, 3, 4, 5, 8, 13, 17, 19, 20, 25)
Modelo A1453 – (Modelo Mundial) Diseñado específicamente para funcionar con Sprint en Estados Unidos y Softbank en Japón, además de ser compatible con las redes de los modelos A1533 GSM y CDMA.
Las redes compatibles son: CDMA EV-DO Rev. A and Rev. B (800, 1700/2100, 1900, 2100 MHz); UMTS/HSPA+/DC-HSDPA (850, 900, 1700/2100, 1900, 2100 MHz); GSM/EDGE (850, 900, 1800, 1900 MHz); LTE (Bands 1, 2, 3, 4, 5, 8, 13, 17, 18, 19, 20, 25, 26)
Modelo A1457 – Diseñado específicamente para funcionar con Bouygues, Orange y SFR (Francia), Deutsche Telekom y Vodafone (Alemania) y la nueva compañía 4G Ultrarápida EE y Vodafone (Reino Unido) además de ser compatible con las redes GSM del modelo A1533, no es compatible con todas las redes LTE.
Las redes compatibles son: UMTS/HSPA+/DC-HSDPA (850, 900, 1900, 2100 MHz); GSM/EDGE (850, 900, 1800, 1900 MHz); LTE (Bands 1, 2, 3, 5, 7, 8, 20)
Modelo A1530 – Diseñado únicamente para redes LTE de países del área “Asia-Pacífico” (Nueva Zelanda, Korea, Singapur y Hong Kong). No funcionará con redes LTE fuera de esos países.
Las redes compatibles son: UMTS/HSPA+/DC-HSDPA (850, 900, 1900, 2100 MHz); GSM/EDGE (850, 900, 1800, 1900 MHz); FDD-LTE (Bands 1, 2, 3, 5, 7, 8, 20); TD-LTE (Bands 38, 39, 40)

iPhone 5C
Modelo A1532 (GSM) - Esta es la versión desbloqueada de fábrica que se vende en el sitio de Apple así como la diseñada para AT&T y T-Mobile (Estados Unidos), Bell (Virgin), Rogers (Fido) y Telus (Koodo) en Canadá. No es compatible con CDMA.
Las redes compatibles son: UMTS/HSPA+/DC-HSDPA (850, 900, 1700/2100, 1900, 2100 MHz); GSM/EDGE (850, 900, 1800, 1900 MHz); LTE (Bands 1, 2, 3, 4, 5, 8, 13, 17, 19, 20, 25)
Las redes compatibles son: CDMA EV-DO Rev. A and Rev. B (800, 1700/2100, 1900, 2100 MHz); UMTS/HSPA+/DC-HSDPA (850, 900, 1700/2100, 1900, 2100 MHz); GSM/EDGE (850, 900, 1800, 1900 MHz); LTE (Bands 1, 2, 3, 4, 5, 8, 13, 17, 19, 20, 25)
Modelo A1456 – (Modelo Mundial) Diseñado específicamente para funcionar con Sprint en Estados Unidos y Softbank en Japón, además de ser compatible con las redes de los modelos A1532 GSM y CDMA.
Las redes compatibles son: CDMA EV-DO Rev. A and Rev. B (800, 1700/2100, 1900, 2100 MHz); UMTS/HSPA+/DC-HSDPA (850, 900, 1700/2100, 1900, 2100 MHz); GSM/EDGE (850, 900, 1800, 1900 MHz); LTE (Bands 1, 2, 3, 4, 5, 8, 13, 17, 18, 19, 20, 25, 26)
Modelo A1507 – Diseñado específicamente para funcionar con Bouygues, Orange y SFR (Francia), Deutsche Telekom y Vodafone (Alemania) y la nueva compañía 4G Ultrarápida EE y Vodafone (Reino Unido) además de ser compatible con las redes GSM del modelo A1532, no es compatible con todas las redes LTE.
Las redes compatibles son: UMTS/HSPA+/DC-HSDPA (850, 900, 1900, 2100 MHz); GSM/EDGE (850, 900, 1800, 1900 MHz); LTE (Bands 1, 2, 3, 5, 7, 8, 20)
Modelo A1526 – Este modelo está diseñado para el mercado Chino, no funciona con redes LTE ni CDMA.
Las redes compatibles son: UMTS/HSPA+/DC-HSDPA (850, 900, 1700/2100, 1900, 2100 MHz); GSM/EDGE (850, 900, 1800, 1900 MHz)
Modelo A1529 – Diseñado únicamente para redes LTE de países del área “Asia-Pacífico” (Nueva Zelanda, Korea, Singapur y Hong Kong). No funcionará con redes LTE fuera de esos países.
Las redes compatibles son: UMTS/HSPA+/DC-HSDPA (850, 900, 1900, 2100 MHz); GSM/EDGE (850, 900, 1800, 1900 MHz); FDD-LTE (Bands 1, 2, 3, 5, 7, 8, 20); TD-LTE (Bands 38, 39, 40)
Conclusiones
En la mayoría de los países de Centro y Sudamérica debes comprar los siguientes modelos:iPhone 5S – El modelo A1533 o si eres un viajero frecuente el modelo A1453 el cual funciona, en prácticamente todo el mundo.
iPhone 5C - El modelo A1532 o si eres un viajero frecuente el modelo A1456 el cual funciona, en prácticamente todo el mundo.
También en este link, encontrarán una lista actualizada de redes LTE y sus operadores a nivel mundial.
martes, 6 de mayo de 2014
SAMSUNG ACTIVE S4 I537 ROOT METHOD
4.3 OTA ML2 Root Method!
Hello there fellow XDA peeps. I figured out the way to root the OFFICIAL OTA 4.3 Update. Build Number UCUBML2.
1. Download the the following file http://www.mediafire.com/download/x4...kernel.tar.md5 and flash it with odin under PDA. I pulled the boot.img from the 4.3 leak and as we all know it is vulnerable to saferoot and other root method around.
2. After phone reboots enable USB debugging mode try using saferoot or Vroot..google it... it will work .
3. Because this is an older kernel, wifi and some other stuff dont work but dont panic. Flash the next file https://www.mediafire.com/?08j1wqn0x7igjq0 with odin under PDA . This is the stock ML2 kernel.
4. After phone reboots launch Supersu and allow the binary to get updated. Also disable that pesky Knox
5 .???
6. Profit. Enjoy your rooted apps and safestrap
P.S. I have the 4.2.2 modem because I had to repair the imei of the phone..but just ignore it. and again enjoy
Credits to all the people that came up with the kernel exploits like Saferoot etc.
")
Hello there fellow XDA peeps. I figured out the way to root the OFFICIAL OTA 4.3 Update. Build Number UCUBML2.
1. Download the the following file http://www.mediafire.com/download/x4...kernel.tar.md5 and flash it with odin under PDA. I pulled the boot.img from the 4.3 leak and as we all know it is vulnerable to saferoot and other root method around.
2. After phone reboots enable USB debugging mode try using saferoot or Vroot..google it... it will work .
3. Because this is an older kernel, wifi and some other stuff dont work but dont panic. Flash the next file https://www.mediafire.com/?08j1wqn0x7igjq0 with odin under PDA . This is the stock ML2 kernel.
4. After phone reboots launch Supersu and allow the binary to get updated. Also disable that pesky Knox
5 .???
6. Profit. Enjoy your rooted apps and safestrap
P.S. I have the 4.2.2 modem because I had to repair the imei of the phone..but just ignore it. and again enjoy
Credits to all the people that came up with the kernel exploits like Saferoot etc.
miércoles, 16 de abril de 2014
Tutorial to Unlock Sprint Galaxy Note 3 For T-Mobile/AT&T/MVNO's
Tutorial to Unlock Sprint Galaxy Note 3 For T-Mobile/AT&T/MVNO's
Tools required: Hidden Menu Enabled(modified for galaxy note 3): http://goo.gl/y4k2EG MI3 modem (modified to be flashed via odin): http://goo.gl/W0f3Za Odin 3.07 or 3.09 (google for it theres a million mirrors of it) Device must already be internationally unlocked via sprint for this to work (must perform uicc unlock from system updates menu) im working on a way to do this without sprint but for now this is how it is) Region Lock Away: (Free on chainfires thread or consider buying market donate version) http://forum.xda-developers.com/show....php?t=2470551 Device must be rooted: (rooting via this method will trip knox however the modem flash we have to do will likely trip it as well): http://download.chainfire.eu/362/CF-...pr-smn900p.zip Any root browers from play store ServiceMode Shortcut: Grab from play store prl helper or anything with an apn shortcut: Grab from play store Step 1: We need to root the device so put device in download mode holding vol down+home+power while it is off. Flash cf auto root to obtain root (this will void knox). Step 2: Grab a root browser, ServiceMode Shortcut, PRL Helper, and Region Lock Away and install your att/tmobile sim. Step 3: Place device back into download mode. PAY ATTENTION HERE: you need to add the mi3 modem to pda and uncheck auto reboot. LEAVE ON F. RESET TIME CHECKED. After flash has completed remove battery from your phone place it back into download mode and flash mi3 modem again this time leaving auto reboot checked. When your device boots up to to settings->general->about device and check your baseband version to make sure it ends in mi3. if it does not redo step 3. Step 4: Run regionlock away (not required for this all to work just for good measure), And switch your device into gsm/umts only mode in your settings menu. Step 5: Plug your device in and enable usb debugging. run hidden menu enabler. open TestMode Menu. Follow these steps perfectly. 1. click ue setting and info 2. click setting 3. click protocol 4. click as- go to security control and make sure fake security is on, ciphering is off, and integrity is on. after you have seet these hit menu back twice to get back to ue setting and protocol menu. 5. open nas-go to network control go to band selection and pick number 5 wcdma/gsm mode only. after hit menu back. 6. Click pref mode set and choose number 2 gsm wcdma only. menu back once 7.hit aquision order and choose umts_gsm. hit menu back until youre back at ue setting menu. 8. open gcf and click number 1 and make sure it is on. hit menu back to ue settings. 9.go to sim and then sim class control. make sure umts on and gsm on both show. if not click to enable. hit menu back once 10.hit bip block control. hit number 3 bip block off. once complete go to bip block status to verify it is in fact off. 11. go all the way back to main menu. hit protocol state, sim information, check nv, and make sure it shows sim lock is disable, spr bip unblocked, and sha256 on or off shouldnt matter. ( i have had mine off and on and it seems to work either way)(mine is currently on) 12. power cycle device. 13. when it comes on device SHOULD show service it still may not. 14. get into your root browser, go system, and open your build.prop with a text editor 15. add these lines to the very bottom to enable apn editing. (credit to ingenium13) ril.sales_code=LOL ro.csc.sales_code=LOL 16. reboot device once more. now use prl helper or your apn shortcut and create a new apn for your carrier. delete all the sprint ones and make sure you highlight the circle next to your newly created apn. reboot once more. 17. device should come up with full service bars and data/mms active. (if you have an inactive sim card it does not always show service)(my inactive att card would show service my inactive tmobile would not) 18. Donations appreciated now you should be 100% unlocked. if you need to undo this for any reason see post 3 to get fully back on sprint. 19. Profit! | |
miércoles, 9 de abril de 2014
Aporte Samsung Tool - Una app que nos permite hacer backup/restore de la carpeta EFS
HERRAMIENTA PARA DISPOSITIVOS SAMSUNG
ricky310711 miembro de xda nos trae una valiosisima aplicacion para hacer un back up/restore de la carpeta efs de nuestro terminal Samsung.

Como ya la mayoría sabe esta carpeta es importantísima y se recomienda tener varios back ups de la misma en diferentes lugares, como dice el dicho es mejor tenerla y no necestarla, que necesitarla y no tenerla...
Para los que nos estan muy al tanto de la carpeta efs esta contiene, entre otras cosas importantes, los datos del IMEI, PRODUCTCODE, SIM UNLOCK, etc asi que seria un problema perderla y mas sabiendo que podemos hacer un back up guardarlo en un lugar seguro y asi evitarnos malos ratos!
El método para utilizarla es bien sencillo
Es necesario tener acceso root en el sistema
Descargamos la app y la instalamos en nuestro equipo
La abrimos y escogemos hacer el back up de la carpeta y la ruta a guardarla
Damos permisos de superusuario
Listo
El back up se guarda en la carpeta SamsungTool
También el desarrollador incluyó las opciones de reinicio extendido desde la misma aplicación
Dispositivos compatibles
Samsung GT-I9300
Samsung GT-I9305
Samsung GT-I9505
Samsung GT-i9500
Samsung GT-N7100
Samsung GT-N7105
Samsung SM-N900
Samsung SM-N9005
Samsung SM-G900F
Samsung SM-G900H
Samsung SPH-L710
DESCARGAR V3.0 UNIVERSAL
Para agradecer al desarrollador y más detalles visita: xda
lunes, 7 de abril de 2014
How to root the SGH-T399 on version MJA.
How to root the SGH-T399 on version MJA.

Odin One-Click
1) install supersu from teh market
2) power down your device, press and hold home and volume down then press power
3) youll be greeted with a warning screen, press up to continue
4) load up the one click
5) connect your device and wait until you see a yellow box with a com number
6) click start
7) enjoy root.
Please dont go crazy with root i havent figured out how to make system flashable so at this time there is no way to recover from a bootloop. if you break your device its no ones fault but your own, so do be careful of what bloat you start zapping.
If you appreciate the work I've done, my signature contains a link to donate to me.
per gpl here is kernel source i used for this binary: https://mega.co.nz/#!IIwUGSwT!kNhKl70KHMA6o0Nmi_eHMjzteEBH70f1H_y0e6V zj_Y
sábado, 22 de marzo de 2014
How to Update Galaxy Note 3 (T-Mobile) SM-N900T with Android 4.4.2 UVUCNB4 KitKat Official Firmware
How to Update Galaxy Note 3 (T-Mobile) SM-N900T with Android 4.4.2 UVUCNB4 KitKat Official Firmware
 Samsung has started rolling out a new Android 4.4.2 KitKat update for the T-Mobile version of Galaxy Note 3 (SM-N900T). The new official firmware is currently available as an Over-The-Air (OTA) update as well as through Samsung KIES.
Firmware details
PDA: N900TUVUCNB4
CSC: N900TTMBCNB4
MODEM: N900TUVUCNB4
Version: Android 4.4.2
Build date: Feb 12, 2014
Regions: U.S. (T-Mobile)
Samsung Galaxy Note 3 (T-Mobile) SM-N900T users who missed the OTA update notification or unable to access the update over Samsung KIES, may follow our step-by-step guide to install the update manually.
Pre-requisites
1. Install USB Drivers for Samsung Galaxy Note 3 on the computer.
2. Enable USB Debugging Mode on the phone by navigating to Settings >> Developer Options.
3. Make a backup of all your important data before following the guide.
4. Ensure the battery of the phone is charged more than 80 percent.
5. The Android 4.4.2 UVUCNB4 KitKat firmware is compatible only with the T-Mobile version of Galaxy Note 3 (SM-N900T). Applying this to any incorrect variant might brick the device. Verify the model number of the Galaxy Note 3 by navigating to Settings >> About Phone.
Files Required
1. Android 4.4.2 UVUCNB4 KitKat Firmware (Mirror Link)
2. Odin 3.07
Steps to Update Galaxy Note 3 (T-Mobile) SM-N900T with Android 4.4.2 UVUCNB4 KitKat Firmware
Step 1: Extract Firmware zip file using WinRAR/7-Zip/WinZip or any other extracting tool, you will get a .tar.md5 file and some other files (optional).
Step 2: Extract Odin zip file and you will get Odin3 v3.07.exe along with few other files.
Step 3: Switch off the Galaxy Note 3.
Step 4: Boot the device into Download Mode by pressing and holding Volume Down, Home and Power buttons together until a construction Android robot icon with a warning triangle appears on screen. Now press the Volume Up button to enter Download Mode.
Step 5: Run Odin on the computer as an Administrator.
Step 6: Connect the Galaxy Note 3 to the computer using USB cable while it is in the Download Mode. Wait until Odin detects the device. When the device is connected successfully, the ID: COM box will turn to light blue with the COM port number. Additionally, the successful connected will be indicated by a message saying Added.
Step 7: Select the following files in Odin from extracted N900TUVUCNB4 firmware folder:
Step 8: In Odin, enable Auto Reboot and F. Reset Time checkboxes. Also, ensure the Re-Partition checkbox is chosen only if a .pit file was chosen in the previous step.
Step 9: Verify everything suggested in Step 7 and Step 8 is done correctly. Then hit the Start button to begin the installation process.
Step 10: Once the installation process completes, your phone will restart and soon you will see a PASS message with green background in the left-most box at the very top of the Odin. You can now unplug the USB cable to disconnect it from the computer.
Samsung Galaxy Note 3 (T-Mobile) SM-N900T should be now updated with Android 4.4.2 UVUCNB4 KitKat official firmware. Head over to Settings >> About Phone to verify the software version running on the device.
Note: If Galaxy Note 3 (T-Mobile) SM-N900T stuck at booting animation after Step 10 then go to recovery mode (press and hold the Volume Up and Power buttons together) and perform Wipe data/Factory Reset and Wipe Cache Partition task before selecting reboot system now function. In recovery mode use Volume keys to navigate between options and Power key to select the option. Please note, performing wiping task will erase your device internal memory data and not external SD card data.
Firmware details
PDA: N900TUVUCNB4
CSC: N900TTMBCNB4
MODEM: N900TUVUCNB4
Version: Android 4.4.2
Build date: Feb 12, 2014
Regions: U.S. (T-Mobile)
Samsung Galaxy Note 3 (T-Mobile) SM-N900T users who missed the OTA update notification or unable to access the update over Samsung KIES, may follow our step-by-step guide to install the update manually.
Pre-requisites
1. Install USB Drivers for Samsung Galaxy Note 3 on the computer.
2. Enable USB Debugging Mode on the phone by navigating to Settings >> Developer Options.
3. Make a backup of all your important data before following the guide.
4. Ensure the battery of the phone is charged more than 80 percent.
5. The Android 4.4.2 UVUCNB4 KitKat firmware is compatible only with the T-Mobile version of Galaxy Note 3 (SM-N900T). Applying this to any incorrect variant might brick the device. Verify the model number of the Galaxy Note 3 by navigating to Settings >> About Phone.
Files Required
1. Android 4.4.2 UVUCNB4 KitKat Firmware (Mirror Link)
2. Odin 3.07
Steps to Update Galaxy Note 3 (T-Mobile) SM-N900T with Android 4.4.2 UVUCNB4 KitKat Firmware
Step 1: Extract Firmware zip file using WinRAR/7-Zip/WinZip or any other extracting tool, you will get a .tar.md5 file and some other files (optional).
Step 2: Extract Odin zip file and you will get Odin3 v3.07.exe along with few other files.
Step 3: Switch off the Galaxy Note 3.
Step 4: Boot the device into Download Mode by pressing and holding Volume Down, Home and Power buttons together until a construction Android robot icon with a warning triangle appears on screen. Now press the Volume Up button to enter Download Mode.
Step 5: Run Odin on the computer as an Administrator.
Step 6: Connect the Galaxy Note 3 to the computer using USB cable while it is in the Download Mode. Wait until Odin detects the device. When the device is connected successfully, the ID: COM box will turn to light blue with the COM port number. Additionally, the successful connected will be indicated by a message saying Added.
Step 7: Select the following files in Odin from extracted N900TUVUCNB4 firmware folder:
- Click the PDA button and select the .tar.md5 file.
- Click the Phone button and select file with MODEM in its name. Ignore if there is no such file.
- Click the CSC button and select file with CSC in its name. Ignore if there is no such file.
- Click the PIT button and select the .pit file. Ignore if there is no such file.
Step 9: Verify everything suggested in Step 7 and Step 8 is done correctly. Then hit the Start button to begin the installation process.
Step 10: Once the installation process completes, your phone will restart and soon you will see a PASS message with green background in the left-most box at the very top of the Odin. You can now unplug the USB cable to disconnect it from the computer.
Samsung Galaxy Note 3 (T-Mobile) SM-N900T should be now updated with Android 4.4.2 UVUCNB4 KitKat official firmware. Head over to Settings >> About Phone to verify the software version running on the device.
Note: If Galaxy Note 3 (T-Mobile) SM-N900T stuck at booting animation after Step 10 then go to recovery mode (press and hold the Volume Up and Power buttons together) and perform Wipe data/Factory Reset and Wipe Cache Partition task before selecting reboot system now function. In recovery mode use Volume keys to navigate between options and Power key to select the option. Please note, performing wiping task will erase your device internal memory data and not external SD card data.
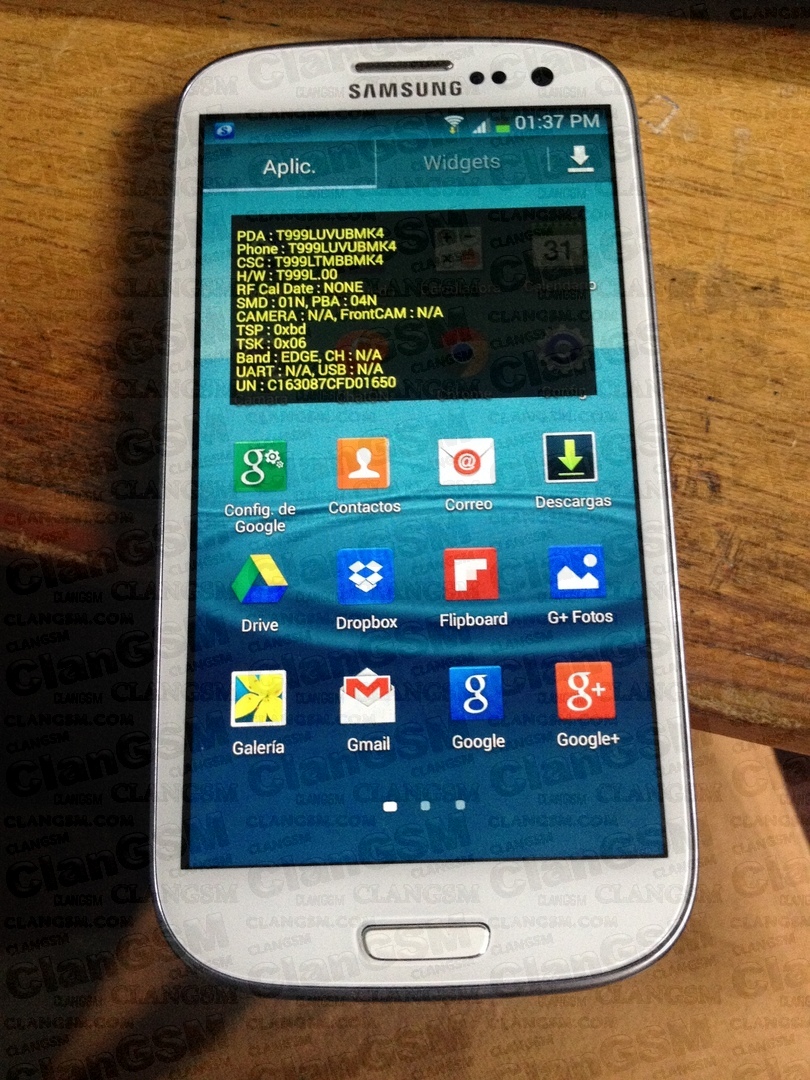
Problem: IMEI = null/null and Baseband = unknown Samsung S4
OK, here is what I did.
The phone: Samsung S4 i9505, firmware 4.4.2
Problem: IMEI = null/null and Baseband = unknown
Cannot get into any other 'service mode' menu, only *#0808# works.
(1) Make sure the phone is rooted and has SuperSU installed and also enable su during boot is ticked under SuperSU settings. (note: when you tap SuperSU it will ask you to disable 'KNOX', tap yes (It's to do with security)
(2) Make sure USB debugging is enabled (under settings menu on phone)
(3) Use "EFS_Professional_2.0.91_Release" to backup everything up (don't worry if you can't do it, but it's lot safer to mess about afterwards)
(4) Search google to find I9505 (or your mobiles model number) EFS backup folder/files/partations and save them onto your PC somewhere. I've been told they're also available on Z3X shell support files.
(5) Connect phone to PC (using normal charger cable) and load Odin307 > search for the EFS files you downloaded and flash by ticking "bootloader" (efs.tar.gz - efs.img - UPDATE_EFS_GT... files names)
(6) When it reboots it may show IMEI = 01/ or only afew numbers (thats good news)
(7) Connect your phone and your Z3X box and load laters Samsung tool.
( Open "Device Manager" on your Windows PC and make sure all the relevant drivers are loaded for the Z3X and Samsung port drivers for your mobile.
(9) Type *#0808# and put phone in 'DM+MODEM+ADB' and reboot. [IMPORTANT: keep phone always connected to Z3X box]
(10) Once rebooted and back into Samsung tool > Choose Samsung port (try both to see which one works) - by the way the "read phone" doesn't work so don't use that as a guide to see if it connects or not) Each function on Samsung tool will only work when the phone is connect into certain mode.
(11) Use IMEI repair function and tick new security and re-set EFS > type the original IMEI (with is loacted under battery of phone and serial number in all CAPS, not lowercase)
(12) Does the usual and reboots and if it fails at "Bypass MSL" (which had happend to me) just keep retrying and rebooting (with 'DM+MODEM+ADB' and reboot) and after a few tries and it succeed.
(13) Once you've got the IMEI and Baseband back it will need to be Flashed again using Odin307 with the proper original 4.4.2 full kitkat, which had just been released a few days a go (google it). I have had the beta version on.
All done!
OK, try this modem file first:
Modem (CP_I9505XXUFNA5_373648_REV06_user_low_ship_MULTI_CERT.tar through Odin)
https://mega.co.nz/#!UxBUVZjJ!JPFZH3WuFGLzS3fp2lHd1TF9d5t4nnj1lgXh74Mldqg
-----
if it doesnt work then this bootloader:
Bootloader (BL_I9505XXUFNA5_373648_REV06_user_low_ship_MULTI_CERT.tar through Odin)
https://mega.co.nz/#!ZhYiHRKI!UJ3m7yRFwFofoW6dg4I6E28pfH0oiHyjb6nPN8O6Qj0
Keep an eye on this thread as I will be updating files locations to help you. Remeber to reboot and check if null IMEI changes to 01/ or something before going next stage.

Basically, what needs to be done before following the steps above is to flash (using Odin, select - "phone") an older version "modem.bin" file for your model, try several and then use Z3X to attempting unlock or IMEI repair. This step is very important if you have updated newer firmware such as 4.3 or 4.4.2, if you don't do this, you'll get security errors such as MSL error. These files can be found using the google search engine. So try again a few times before giving up.
If this method fails it is more likely a hardware fault.
Check here: http://forum.xda-developers.com/showthread.php?t=2192025
Any foreign one will do as it will be unlocked anyway.

Unfortunately, the most likely problem is a hardware fault on the motherboard. The baseband I.C chip will need to be reballed or replaced.
The phone: Samsung S4 i9505, firmware 4.4.2
Problem: IMEI = null/null and Baseband = unknown
Cannot get into any other 'service mode' menu, only *#0808# works.
(1) Make sure the phone is rooted and has SuperSU installed and also enable su during boot is ticked under SuperSU settings. (note: when you tap SuperSU it will ask you to disable 'KNOX', tap yes (It's to do with security)
(2) Make sure USB debugging is enabled (under settings menu on phone)
(3) Use "EFS_Professional_2.0.91_Release" to backup everything up (don't worry if you can't do it, but it's lot safer to mess about afterwards)
(4) Search google to find I9505 (or your mobiles model number) EFS backup folder/files/partations and save them onto your PC somewhere. I've been told they're also available on Z3X shell support files.
(5) Connect phone to PC (using normal charger cable) and load Odin307 > search for the EFS files you downloaded and flash by ticking "bootloader" (efs.tar.gz - efs.img - UPDATE_EFS_GT... files names)
(6) When it reboots it may show IMEI = 01/ or only afew numbers (thats good news)
(7) Connect your phone and your Z3X box and load laters Samsung tool.
(
Open "Device Manager" on your Windows PC and make sure all the relevant drivers are loaded for the Z3X and Samsung port drivers for your mobile.(9) Type *#0808# and put phone in 'DM+MODEM+ADB' and reboot. [IMPORTANT: keep phone always connected to Z3X box]
(10) Once rebooted and back into Samsung tool > Choose Samsung port (try both to see which one works) - by the way the "read phone" doesn't work so don't use that as a guide to see if it connects or not) Each function on Samsung tool will only work when the phone is connect into certain mode.
(11) Use IMEI repair function and tick new security and re-set EFS > type the original IMEI (with is loacted under battery of phone and serial number in all CAPS, not lowercase)
(12) Does the usual and reboots and if it fails at "Bypass MSL" (which had happend to me) just keep retrying and rebooting (with 'DM+MODEM+ADB' and reboot) and after a few tries and it succeed.
(13) Once you've got the IMEI and Baseband back it will need to be Flashed again using Odin307 with the proper original 4.4.2 full kitkat, which had just been released a few days a go (google it). I have had the beta version on.
All done!
OK, try this modem file first:
Modem (CP_I9505XXUFNA5_373648_REV06_user_low_ship_MULTI_CERT.tar through Odin)
https://mega.co.nz/#!UxBUVZjJ!JPFZH3WuFGLzS3fp2lHd1TF9d5t4nnj1lgXh74Mldqg
-----
if it doesnt work then this bootloader:
Bootloader (BL_I9505XXUFNA5_373648_REV06_user_low_ship_MULTI_CERT.tar through Odin)
https://mega.co.nz/#!ZhYiHRKI!UJ3m7yRFwFofoW6dg4I6E28pfH0oiHyjb6nPN8O6Qj0
Keep an eye on this thread as I will be updating files locations to help you. Remeber to reboot and check if null IMEI changes to 01/ or something before going next stage.
Basically, what needs to be done before following the steps above is to flash (using Odin, select - "phone") an older version "modem.bin" file for your model, try several and then use Z3X to attempting unlock or IMEI repair. This step is very important if you have updated newer firmware such as 4.3 or 4.4.2, if you don't do this, you'll get security errors such as MSL error. These files can be found using the google search engine. So try again a few times before giving up.
If this method fails it is more likely a hardware fault.
Check here: http://forum.xda-developers.com/showthread.php?t=2192025
Any foreign one will do as it will be unlocked anyway.
Unfortunately, the most likely problem is a hardware fault on the motherboard. The baseband I.C chip will need to be reballed or replaced.
lunes, 17 de marzo de 2014
Quitar el logo, molestoso de tu pantalla de tu samsung
Necesitamos ser root y tener un explorador de archivos (por ejemplo el root explorer)
1. Abrimos el root explorer (o el explorador de archivos)
2. Pulsamos sobre montar R/W y nos vamos a la ruta efs/factoryapp/factorymode, una vez ahi se abre con el editor de texto y borramos donde dice OFF y escribimos ON, guardamos el archivo, salir.
3. Borramos un archivo que se crea automaticamente llamado factorymode.bak
4. Reiniciamos y listo.
100% Probado.
jueves, 6 de marzo de 2014
Apn Ultra Mobile Settings Android Phones
Enter the settings as shown below;
• Name - Ultra
• APN - wholesale
• Proxy - blank
• Port - blank
• Username - blank
• Server - blank
• MMSC - http://wholesale.mmsmvno.com/mms/wapenc
• MMS Proxy - blank
• MMS Port - blank
• MCC - 310
• MNC - 260
• Authentication Type - blank
• APN Type- default,supl,mms
• Name - Ultra
• APN - wholesale
• Proxy - blank
• Port - blank
• Username - blank
• Server - blank
• MMSC - http://wholesale.mmsmvno.com/mms/wapenc
• MMS Proxy - blank
• MMS Port - blank
• MCC - 310
• MNC - 260
• Authentication Type - blank
• APN Type- default,supl,mms
lunes, 3 de febrero de 2014
SAMSUNG MEGA M819N UNLOCK AND REPAIR IMEI
my people just release a m819n pcs metro, as I527 with octopus OR with z3x
UNLOCK
Selected model: I527
Selected port: COM318 SAMSUNG Mobile USB Serial Port
Selected port speed: 115200
Searching ADB device...
Please, allow USB debugging on phone... OK
Reading phone info...
Model: SGH-M819N
Android version: 4.2.2
Product code: SGH2M819ZKATMB
Phone version: M819NUVUAMJ5
PDA version: M819NUVUAMJ5
CSC version: M819NTMBAMJ5
IMEI: 358865050113285
Phone S/N: RV1DA8DSHNH
Checking phone at COM318 OK
Backuping NVM... OK
Checking Super user right... true
Backuping MMCBLK... OK
Writing data to phone... OK
Rebooting phone... OK
Checking phone at COM318 OK
Restoring NVM... OK
Reseting... OK
Unlock done
IMEI FIX
Selected model: I527
Selected port: COM318 SAMSUNG Mobile USB Serial Port
Selected port speed: 115200
Searching ADB device... OK
Reading phone info...
Model: SGH-M819N
Android version: 4.2.2
Product code: SGH2M819ZKATMB
Phone version: M819NUVUAMJ5
PDA version: M819NUVUAMJ5
CSC version: M819NTMBAMJ5
IMEI: 358865050113285
Phone S/N: RV1DA8DSHNH
Checking phone at COM318 OK
Backuping NVM... OK
Checking Super user right... true
Backuping MMCBLK... OK
Writing data to phone... OK
Rebooting phone... OK
Checking phone at COM318 OK
Repairing IMEI... OK
Restoring NVM... OK
Reseting... OK
Repair done
4G LTE UNLOCK (((OK))))
viernes, 3 de enero de 2014
HTC One is granted S-OFF by Revolutionary
HTC One is granted S-OFF by Revolutionary
Revolutionary dev team has done it once again, providing the Sprint and GSM HTC One Models with S-OFF with their early Developer preview!

NOTE: This isnt for the avarage joe, I would sugguest waiting for a One Click tool before atempting this hack as one wrong move and result in a hard brick!
You can find the official support thread at XDA Developers
NOTE: This isnt for the avarage joe, I would sugguest waiting for a One Click tool before atempting this hack as one wrong move and result in a hard brick!
You can find the official support thread at XDA Developers
We want to give you S-OFF as soon as practically possible so an early access preview release is not a polished product but it does work (mostly). It will:-
* require knowledge of common android tools like adb and/or fastboot
* be a command line tool
* be rough around the edges
* probably crash sometimes
* fail to work everytime or in all cases or on different carrier ROMs - LET US KNOW if you get repeated failure on carrier variants.
* certainly not look pretty.
* despite being "early access" be very unlikely to brick your device (but naturally, this is possible, it's still a hack).
* give you a very good chance of getting S-OFF. Today. Right now.
Status
* revone has been known to grant S-OFF on the latest WWE & EU RUU and Sprint HTC One.
* revone might also work on the Droid DNA 2.04 and 2.06. Awaiting (your) feedback.
Download
* Get the Android SDK for ADB. You may need to update to the latest version of the SDK for jellybean devices.
* Download revone: http://revolutionary.io/revone
Instructions
Use any operating system you like, you only need adb.
1. Download revone (above) and push it to your device: adb push revone /data/local/tmp/
2. Open an adb shell and:
* cd /data/local/tmp
* chmod 755 revone
3. (optional) If your device is unlocked and rooted please switch to root using su.
4. Prepare to gain S-OFF by running the command: ./revone -P
4a. If revone reports success reboot the device and proceed to step 5)
4b. If revone reboots the device (we'll pretend this isn't an undiagnosed random crash) please wait 2 minutes then try again from step 2.
4c. If revone reports that you need to reboot and try again please reboot and try again from step 2.
5. Now that revone has successfully prepared your device for S-OFF please open another adb shell (as per step 2) and change to
the /data/local/tmp directory.
6. Instruct revone to grant you S-OFF and unlock status by running the command: ./revone -s 0 -u
6a. Other optional command arguments:-
* -u - Unlock the device
* -l - Lock the device (as if it was never unlocked)
* -r - Relock the device (mark the device as relocked)
* -t - Reset the device's tamper flag.
7. Presuming revone reported success please reboot the device again, this time to the bootloader (adb reboot bootloader)
8. You should now observe your device is S-OFF (and the lock status changed if you invoked that option).
9. (optional) Re-run revone to remove TAMPERED from your HBOOT screen: ./revone -t
Credits
revone is brought to you by the Revolutionary dev team.
We've been silent, we're back.
Disclaimer
Revolutionary dev team disclaims all responsibility for your use of revone (and any of our tools): If the world ends, it's not our fault. If your device spontaneously ignites, well, that's not our fault either. You make the choice to use our tool, we don't force it upon you.
Support
Please visit #revolutionary on the Freenode IRC network. We will try to support you in the best way possible, but remember, this is early access, and operators might be asleep or not available at the time you join. Just hang around and wait for someone to answer
This tool will grant you Super CID on your HTC Device htc one t-mobile
This tool will grant you Super CID on your HTC Device
Warning to Sprint WLS Users! Do Not use the second have of this guide, Only use the script provided!
Tested on the following devices:
HTC One M7_UL


What is a CID?
CID lock (aka vendor lock): Carrier Id - put on your device by the manufacturer to prevent installation of a ROM not released by them. Commonly used in the form `CID-Unlocking`. If you purchase your phone (example) from 3Mobile (3Mobile is the ‘carrier’), your phone will only accept 3Mobile ROMs (the carrier’s ROMs). If you want to flash ROMs from other carrier, you’ll need to CID-unlock your phone, so that your phone will accept other ROMs. All bootloaders (apart from HardSPL and SSPL) will only allow a ROM with the correct CID to be flashed onto the device. A device which has been CID unlocked will have ‘SuperCID’ which allows ANY ROM to be loaded onto the device, SuperCID also unlocks the Ext_ROM and allows it to be mounted. Note: In general, the phrase ‘unlock your phone’ usually refers to SIM-unlock, not CID unlock.
What is Super CID?
SuperCID : by CID unlocking your device the value of the CID is changed to SuperCID . This allows the flashing of ANY ROM/RUU to the device regardless of the carrier and also unlocks the read/write capability of the Ext_ROM.
How to use the script?
Download the attached file
Extract the file
boot your phone into bootloader
Run the script and follow the on screen instructions
How do i get my phone into bootloader?
Power down the device
hold vol down and power at the same time
You can Download the script for Windows here [ATTACH]2270[/ATTACH]
One the HTC One M7, Super CID is stored in 2 different locations now and that fastboot forcing the new CID does not fully finish the task so you will also need to do the following to complete the task your self.
Thanks to cyber6 from XDA for this guide
You do this at your own risk!!! This could turn your new phone into a very expensive paperweight!!! If you don't know how to do it or are uncomfortable DON'T DO IT!!!
You need ADB and an understanding of how to use it and have a rooted device. You will also need a hex editor like HxD.
1. Fire up your command prompt and go to the directory that you have ADB installed to. Type "adb shell" and hit enter.
2. Type "su" and hit enter. You now have root privileges.
3. Next type "dd if=/dev/block/mmcblk0p19 of=/sdcard/mmcblk0p19" and hit enter. This will dump the partition to your sdcard.
4. Next type "exit", hit enter, type "exit", and hit enter again. This should take you back to a command prompt for your computer.
5. type "adb pull /sdcard/mmcblk0p19" and hit enter. NOTE THE SIZE OF THE FILE BEFORE THE NEXT STEP!
6. Open the file (mmcblk0p19) with your hex editor. DOWNLOAD HEX Editor for Windows
7. Look for offset 00000000 and you should see your CID
8. Change CID to 11111111 and save the file as mmcblk0p19MOD. This will give you SuperCID as well. MAKE SURE AT THIS POINT THAT THE FILE IS THE EXACT SIZE IT WAS BEFORE YOU HEX EDITED IT!
9. Now go back to your command prompt and type "adb push mmcblk0p19MOD /sdcard/mmcblk0p19MOD" and hit enter.
10. Type "adb shell" and hit enter then type "su" and hit enter again. This will put you back into the android shell and give you root privileges.
11. Type "dd if=/sdcard/mmcblk0p19MOD of=/dev/block/mmcblk0p19" and hit enter. To test if it worked restart the phone into fastboot (type "adb reboot bootloader" and hit enter) and once the bootloader screen comes up type "fastboot oem readcid" and hit enter. It should read "11111111".
12. Next type "fastboot reboot" and hit enter. After the phone rebooted open command line and type "adb shell getprop ro.cid" and you
can see the supercid
Warning to Sprint WLS Users! Do Not use the second have of this guide, Only use the script provided!
Tested on the following devices:
HTC One M7_UL
What is a CID?
CID lock (aka vendor lock): Carrier Id - put on your device by the manufacturer to prevent installation of a ROM not released by them. Commonly used in the form `CID-Unlocking`. If you purchase your phone (example) from 3Mobile (3Mobile is the ‘carrier’), your phone will only accept 3Mobile ROMs (the carrier’s ROMs). If you want to flash ROMs from other carrier, you’ll need to CID-unlock your phone, so that your phone will accept other ROMs. All bootloaders (apart from HardSPL and SSPL) will only allow a ROM with the correct CID to be flashed onto the device. A device which has been CID unlocked will have ‘SuperCID’ which allows ANY ROM to be loaded onto the device, SuperCID also unlocks the Ext_ROM and allows it to be mounted. Note: In general, the phrase ‘unlock your phone’ usually refers to SIM-unlock, not CID unlock.
What is Super CID?
SuperCID : by CID unlocking your device the value of the CID is changed to SuperCID . This allows the flashing of ANY ROM/RUU to the device regardless of the carrier and also unlocks the read/write capability of the Ext_ROM.
How to use the script?
Download the attached file
Extract the file
boot your phone into bootloader
Run the script and follow the on screen instructions
How do i get my phone into bootloader?
Power down the device
hold vol down and power at the same time
You can Download the script for Windows here [ATTACH]2270[/ATTACH]
One the HTC One M7, Super CID is stored in 2 different locations now and that fastboot forcing the new CID does not fully finish the task so you will also need to do the following to complete the task your self.
Thanks to cyber6 from XDA for this guide
You do this at your own risk!!! This could turn your new phone into a very expensive paperweight!!! If you don't know how to do it or are uncomfortable DON'T DO IT!!!
You need ADB and an understanding of how to use it and have a rooted device. You will also need a hex editor like HxD.
1. Fire up your command prompt and go to the directory that you have ADB installed to. Type "adb shell" and hit enter.
2. Type "su" and hit enter. You now have root privileges.
3. Next type "dd if=/dev/block/mmcblk0p19 of=/sdcard/mmcblk0p19" and hit enter. This will dump the partition to your sdcard.
4. Next type "exit", hit enter, type "exit", and hit enter again. This should take you back to a command prompt for your computer.
5. type "adb pull /sdcard/mmcblk0p19" and hit enter. NOTE THE SIZE OF THE FILE BEFORE THE NEXT STEP!
6. Open the file (mmcblk0p19) with your hex editor. DOWNLOAD HEX Editor for Windows
7. Look for offset 00000000 and you should see your CID
8. Change CID to 11111111 and save the file as mmcblk0p19MOD. This will give you SuperCID as well. MAKE SURE AT THIS POINT THAT THE FILE IS THE EXACT SIZE IT WAS BEFORE YOU HEX EDITED IT!
9. Now go back to your command prompt and type "adb push mmcblk0p19MOD /sdcard/mmcblk0p19MOD" and hit enter.
10. Type "adb shell" and hit enter then type "su" and hit enter again. This will put you back into the android shell and give you root privileges.
11. Type "dd if=/sdcard/mmcblk0p19MOD of=/dev/block/mmcblk0p19" and hit enter. To test if it worked restart the phone into fastboot (type "adb reboot bootloader" and hit enter) and once the bootloader screen comes up type "fastboot oem readcid" and hit enter. It should read "11111111".
12. Next type "fastboot reboot" and hit enter. After the phone rebooted open command line and type "adb shell getprop ro.cid" and you
can see the supercid
Suscribirse a:
Entradas (Atom)